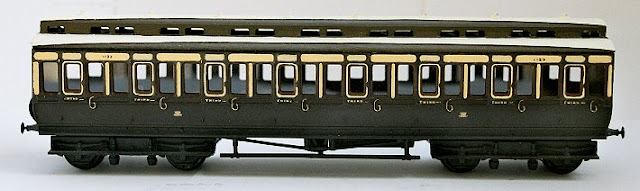
All Third to Diagram C10, composed of two Triang Brake Thirds
The old Triang clerestory coaches provide some scope for conversions into more prototypical models. I had a couple of the Brake Thirds lying about, and decided to see what a bit of hacking about would produce.
Edit March 2015: This project was done some 15 years ago. I originally described it as a C22, thinking that a C22 and C10 were virtually identical coaches. However, I later realized that the C22 was 8'6" wide (approx. 33.9 scale mms) , whereas the C10 was 8'0" 3/4 wide (approx. 32.2 scale mms). The Triang coaches are 32 mms wide, so very close to the C10. Indeed, I have since had the opportunity to compare my converted Triang coach to one of the much praised Slaters kits for a C10. The width, length and body height are virtually identical.
Components used
- 2 Triang Clerestory Brake Thirds (compartment ends only)
- Bogies and underframe details from a Hornby long Clerestory coach
- Various bits of Plastikard (sheet and blocks) and clear styrene
Essentially, the C10 is composed from the compartment ends of the two Triang Brake Thirds. This may seem a little wasteful, but the residual brake ends can later be used for constructing a decent Brake Van to Diagram V5.
The underframe details from the long Hornby Clerestory were used since I also had these lying about, and because I like making do with what I have. These Hornby parts do require some modification, and could alternatively be replaced with separately purchased detailing parts. This will however add additional cost to the model.
Note that even for a simple and cheap project such as this, it really is necessary to have a scale drawing of the diagram in question to work from - such as the one in Russels book.
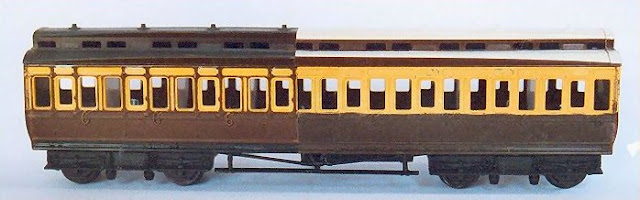
The C10 during construction, showing the two ends assembled
Main Steps
- Prepairing the main coach body
Having dismantled the Brake Thirds into their constituent parts (including removal of the roof and the awful bogies), I used a razor saw to separate the compartment ends from the brake ends. Put crudely, one body was cut just after the 11th window, the other just after the 13th window see picture above). The two compartment ends were then carefully worked with wet-and-dry sandpaper to ensure a good fit, and joined together with superglue. The remaining brake ends were set aside for subsequent use on another project. - Cutting and shutting
The next step was to shorten the outermost panel at both ends of the new coach body, as these are too wide if compared with the drawing in Russels book. This was done by cutting off the ends entirely with the razor saw, and removing about 2mms of each end panel with a file. This is a slightly tricky operation as the plastic can be rather brittle here, and some slight rebuilding of the panel with plastic putty was necessary. The shortened end pieces were then refitted to the coach body. - Bogies and underframe
I next set about making the two Dean 8'6" bogies that were typical for these types of coaches. For this I used the Dean 10 foot bogies provided on the long Hornby Clerestory coaches. These bogies are roughly speaking longer versions of the 8'6" type, and were basically cut into three parts, appropriately shortened and then reassembled with superglue, filler and patience. This was a rather dreary job as the Hornby bogies are made from a very uncooperative type of plastic, but the only alternative 8'6" bogies I could find were Blacksmith etched brass items, which I thought was rather over the top for this kind of project. Having fitted the bogies to the coach body (using small bolts and Plastikard packing) I then poached further undeframe details from the Hornby long clerestory. This included step-boards, tanks and V-irons, all cut about to fit the C10. The stepboards were removed on some of the C10s in their later days, so it is legitimate to leave them off if you like. - Roof and interior
The two rooves from the Triang Brake Thirds were then treated much like the coach bodies: The compartment ends were cut off and joined into one piece, and the outermost sections were then 'cut and shut' to fit with the windows and ventilators on the body below. Finally, inside the coach, compartment dividers were made from Plastikard sheet, and simple seats were cut from blocks of Plastikard. Windows were glazed with 0.25mm clear styrene from Evergreen.
I painted the coach in a simplified version of the pre-1908 livery, using HMRS Pressfix transfers for the monogram and class designations. Further detailing is of course possible, but for me this was a 'cheap and cheerful' project which does not really warrant any further expense. The end result is a coach which was fairly quick to build, and close to a C10 for my liking, although it does not stand comparison with more advanced examples, such as the similar C10 from Slaters.